The Scanner Appliance image is available in the Microsoft Azure Marketplace as an Azure Virtual Machine Image. This image allows our customers to easily set up a Scanner Appliance within their Azure account.
To install a new Scanner Appliance, follow these step-by-step instructions.
Before you begin the installation process, we highly recommend that you take a look at the requirements. This step will ensure a smooth and successful installation of the Scanner Appliance.
System requirements
The system requirements needs to be set prior to booting the Scanner Appliance for the first time. Read about the system requirements here:
https://support.holmsecurity.com/knowledge/what-are-the-system-requirements-for-the-scanner-appliance
Firewall requirements
To ensure proper communication between the Scanner Appliance and Security Center, it is important to review the following information:
https://support.holmsecurity.com/knowledge/what-are-the-firewall-settings-for-scanner-appliance
Preparation for the Scanner Appliance in Security Center
- Ensure that you have added a new Cloud Azure Scanner Appliance in Security Center, where a token will be generated.
- Hover over Assessments
- From the dropdown menu that appears, select Scanner appliances
- Click Add appliance --> Cloud
- Set a name for your Scanner Appliance and choose Azure.
- Click Next twice.
- Add NTP Servers (optional).
- Click Finish
- Note down the token you received from the Scanner Appliance list. It will be used when initiating the virtual machine in Azure.
-
Set up the Scanner Appliance in Azure
- Log in to Azure Portal.
- Go to Marketplace and search for Holm Security Cloud Scanner Appliance.
- Click Create a virtual machine.
- Fill in the following in the Basic menu:
- Select your Resource group.
- Type in your Virtual machine name
- Make sure of the selected Region.

- Notice regarding public inbound ports: By default, port 22 SSH is enabled.
- Select your image size. Ensure the image size meets our requirements outlined in step 3.
- By default, the virtual machine will be created in a new Virtual Network (VNET).
If you want to use your own VNET, then click on Networking and select your VNET for the virtual machine.
- Click Review + Create, wait for Azure to review and for the validation to pass, and click Create.
- A window will pop up about a new key pair has been generated. Click on Download private key and create resource.
- After the Scanner Appliance has been deployed, click on your Appliance, scroll down to Help > Serial Console, and wait for the console UI to show up.

- In the Appliance console UI choose:
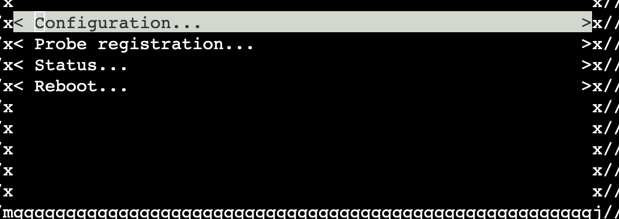
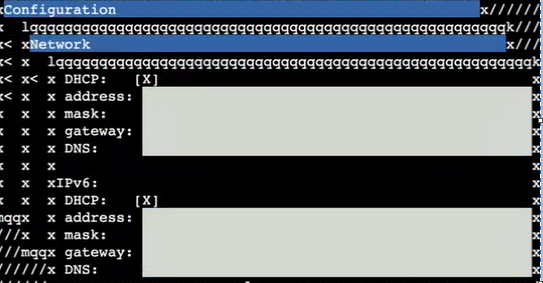
- Configuration > Network and press enter. Now you need to fill out the following values manually and save by pressing F11 (Fn+F11).
- IPv4 address
- IPv4 network
- IPv4 gateway
- IPv4 dns-nameservers
- IPv6 address
- IPv6 network
- IPv6 gateway
- IPv6 dns-nameservers
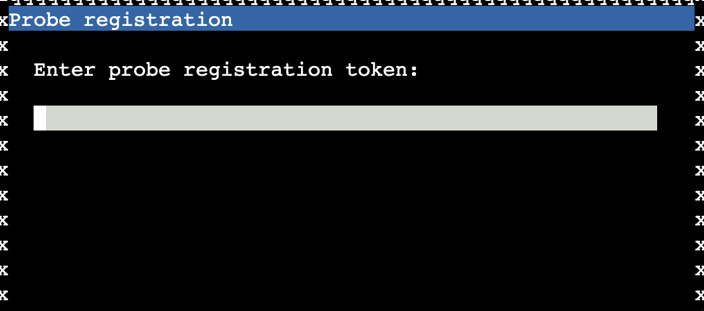
- Then choose the option Probe registration, input the token (located under the Scanner Appliance section in Security Center) and press F11 (Fn+F11) to confirm the registration.
- Configuration > Network and press enter. Now you need to fill out the following values manually and save by pressing F11 (Fn+F11).
- Reboot the appliance.
- In Security Center, you can check the activation to make sure the scanner was registered correctly.
- Done!