The Partner Portal API gives you programmatic access to your portal data. Use it to automate billing reconciliation, feed data into internal dashboards, or connect the portal with your own tools and systems. Access is managed entirely from the API tab in Settings, which is visible to Admin users only.

What the API provides access to
The API covers four areas of data, each controlled by a scope on your API key:
| Scope | What it returns |
| me:read | Your partner identity, API key name, and active scopes. Always included. |
| mssp-report:read | Reporting periods, eligible companies, and product usage data for MSSP partnerships. |
| reseller-report:read | Calendar month periods, companies, and product usage data for Reseller partnerships. |
| customers:read | Customer list, engagement metrics, and churn risk indicators. Optional - toggle on or off when creating a key. |
MSSP and reseller report scopes are mutually exclusive. Each API key is tied to one partnership, and its report scope is set automatically based on that partnership type. If you manage both an MSSP and a Reseller partnership, create a separate API key for each.
The API uses the following product codes throughout all responses:
| Code | Product |
| SNS | System & Network Security |
| DA | Device Agent |
| WAS | Web Application Security |
| CS | Cloud Security |
| PAT | Phishing Simulation & Awareness Training |
Enabling API access
The API tab shows a locked state until API access is enabled. To enable it:

- Go to Settings and open the API tab.
- Click Enable API access.
- Your Organization Key is created and the full API management interface appears.
This is a one-time action. The Organization Key (format: hsp_org_...) is always visible in the portal and identifies your organization in all API requests. It does not need to be rotated separately - it remains until you explicitly delete it.

To disable API access entirely, click the delete icon ![]() next to your Organization Key. This permanently removes all API keys and active sessions. Any integrations using those keys will stop working immediately. You can re-enable access at any time, but a new Organization Key will be generated.
next to your Organization Key. This permanently removes all API keys and active sessions. Any integrations using those keys will stop working immediately. You can re-enable access at any time, but a new Organization Key will be generated.
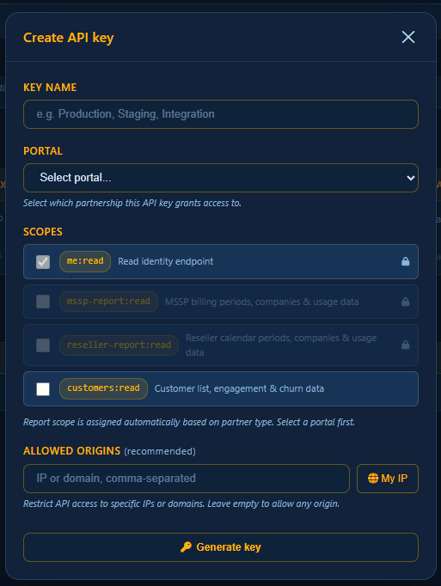
Creating an API key
Click Create API key to open the key creation form. Complete the following fields:
-
Key Name - A label to help you identify the key, for example Production or Billing integration. Maximum 100 characters.
-
Portal - Select which partnership this key should access. If you manage multiple partnerships, each key is scoped to one. Create a separate key for each partnership you need to access programmatically.
-
Scopes - The report scope (mssp-report:read or reseller-report:read) is assigned automatically based on the selected partnership and cannot be changed. The customers:read scope is optional and can be toggled on or off.
-
Allowed origins (recommended) - Enter a comma-separated list of IP addresses or domains that are permitted to use this key. Click My IP to automatically detect and add your current external IP address. If you leave this field empty, the key can be used from any IP address - you must confirm this by checking the acknowledgement box before the key can be saved.
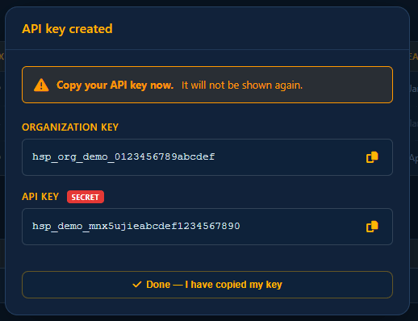
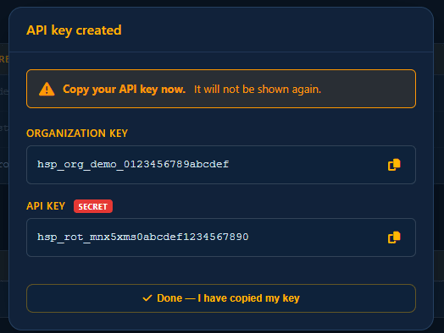
After clicking Create, a modal appears showing both your Organization Key and the newly generated API key. The API key is marked as SECRET and is shown only once - copy it immediately and store it securely. Once you close the modal, the full key value cannot be retrieved. Only the first 8 characters (the key prefix) are shown in the keys table for reference.
How API keys work
Authentication uses a two-key system. Every API call follows this flow:
-
Step 1 - Use your Organi Key and API Key together to create a session. Send a POST request to https://portal-api.holmsecurity.com/v1/auth/session with both keys in the request body. The API returns a session token (format: pps_...).
-
Step 2 - Include the session token in all subsequent API requests using the Authorization header: Authorization: Session your-session-token
-
Step 3 - When you are finished, invalidate the session by sending DELETE to https://portal-api.holmsecurity.com/v1/auth/session.
Session validity
Sessions are valid for one hour. Your organiz can have a maximum of five active sessions at any time across all API keys. Each session is bound to the IP address that created it - requests from any other IP address are rejected, even if they include a valid token.
Allowed origins
When allowed origins are configured on an API key, each session creation request is also validated against the request origin. The API derives this origin from the request IP, the X-Forwarded-For header, the Origin header, or the Referer header. How this validation behaves depends on whether allowed origins are set and whether the request origin can be determined:
| Allowed origins configured? | Origin available in request? | Session creation | Session usage |
| No | Yes | Created, locked to request IP | IP checked on every request |
| No | No | Created without IP lock (warning returned) | Works from any IP - no lock, no origin restrictions |
| Yes | Yes | Created if origin matches allowed list | Both IP lock and allowed origins checked on every request |
| Yes | No | Blocked - 403 error | N/A - session never created |
API rate limit
The API is limited to one request per second per session. If you exceed this rate, you will receive a 429 response that includes a retry_after_ms value indicating how long to wait before sending the next request.
For full details please visit https://portal-api.holmsecurity.com/docs/
Editing a key
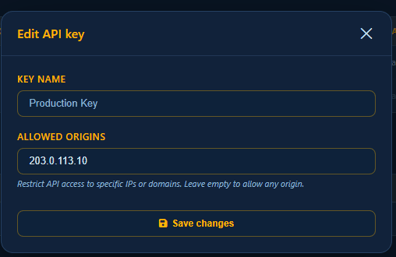
To update the allowed origins on an existing key, click the edit icon next to the key in the keys table. You can update the list of allowed IP addresses and domains. The key name, portal, and scopes cannot be changed after creation.
Rotating a key
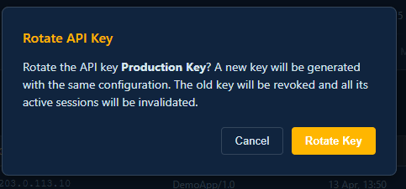
Rotation generates a new API key with the same name, scopes, portal, and origin settings. The old key is immediately revoked and all its active sessions are terminated. Use rotation to refresh credentials without changing any configuration - only the key value itself changes.
To rotate a key, click Rotate in the keys table and confirm the action. The Key Created modal appears with the new API key. Copy it immediately - it is shown only once.
The portal displays a Rotation due badge on any key that has not been rotated in over 6 months. This is advisory - the key remains fully functional, but regular rotation is recommended for security.
Revoking a key

To permanently disable a key, click Revoke in the keys table and confirm. All active sessions using that key are immediately terminated. Revoked keys remain visible in the table for audit purposes but cannot be reactivated. To replace a revoked key, create a new one.
Managing active sessions

The Active Sessions section below the keys table shows all current sessions across all API keys, including which key created each session, the originating IP address, when it expires, and when it was last used.
To end a session immediately, click Invalidate next to it and confirm. The API client using that session will be disconnected. Use this if you need to free up a session slot (the maximum is 5 active sessions per organization) or if you suspect a session should no longer be active.
Click Refresh to reload the sessions list at any time.
For developers
Full API documentation - including all available endpoints, request and response formats, pagination, and error handling - is available at https://portal-api.holmsecurity.com/docs/ or via the API Guide link at the top of the API Settings section in the portal.