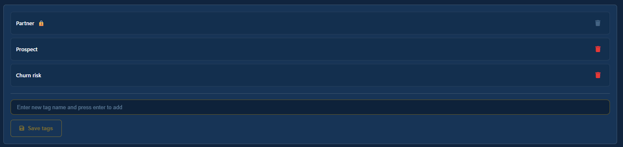
The Tags manager, accessible in Settings, allows you to create and remove tags that can be applied to customers within your dashboard.

Adding tags
To add a new tag, enter the desired tag name in the input field below the current list of tags and press Enter. The tag will appear in the list. You can enter multiple tags in this way before clicking the Save tags button to confirm and store your changes.
If you attempt to leave the Tags Manager before saving your changes, a prompt will notify you of unsaved changes. You can then choose to cancel and return to save your updates, or proceed without saving.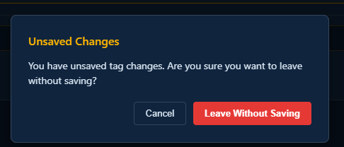
Deleting tags
To delete tags from your list, click the red trashcan icon located to the right of each tag you wish to remove. Once you have made your selections, confirm your updated tag list by clicking the Save tags button. You can delete multiple tags at once, but changes will only be applied after you save.
If a tag is currently in use within the dashboard, you will not be able to remove it from the tag list. This is indicated by a lock icon next to the tag name and a greyed-out red trashcan icon. To delete the tag, first remove it from all companies in the dashboard where it is applied; once it is no longer in use, you can then delete the tag from the list.
If you attempt to leave the Tags Manager before saving your changes, a prompt will notify you of unsaved changes. You can then choose to cancel and return to save your updates, or proceed without saving.