
Share your Azure subscription ID with us to share the Scanner Appliance image with your account.
To install a new Scanner Appliance, simply follow these step-by-step instructions.
Before you begin the installation process, we highly recommend that you take a look at the requirements. This step will ensure a smooth and successful installation of the Scanner Appliance.
System requirements
https://support.holmsecurity.com/knowledge/what-are-the-system-requirements-for-the-scanner-appliance
Firewall requirements
To ensure proper communication between the Scanner Appliance and Security Center, it is important to review the following information:
https://support.holmsecurity.com/knowledge/what-are-the-firewall-settings-for-scanner-appliance
Preparation for the Scanner Appliance in Security Center
- Ensure that you have added a new Cloud Azure Scanner Appliance in Security Center, where a token will be generated.
- Go to Scanner Appliance
- Click Add Appliance -> Cloud
- Set a name for your Scanner Appliance and choose Azure or AWS.
- Click Next twice.
- Add NTP Servers (optional).
- Click Finish
- Note down the token you received from the Scanner Appliance list. It will be used when initiating the virtual machine in Azure.
Set up the Scanner Appliance in Azure
- Log in to Azure Portal.
- Go to Virtual machines and click + Create > Azure virtual machine
- Fill in the following in the Basic menu:
- Select your Resource group.
- Type in your Virtual machine name
- Make sure of the selected Region.

- Notice regarding public inbound ports: By default, port 22 SSH is enabled.
- Under Security type, select Standard.
- Under Image, click See all images.
- Search for Holm and click on View private plans to select the image that we shared with your environment earlier.

- Choose the image named Holm Security Cloud Scanner Appliance (preview) and click select.

- Search for Holm and click on View private plans to select the image that we shared with your environment earlier.
- Select your image size. Ensure the image size meets our requirements outlined in step 3.
- By default, the virtual machine will be created in a new Virtual Network (VNET).
If you want to use your own VNET, then click on Networking and select your VNET for the virtual machine.
- Click Review + Create, wait for Azure to review and for the validation to pass, and click Create.
- A window will pop up about a new key pair has been generated. Click on Download private key and create resource.
- After the Scanner Appliance has been deployed, click on your Appliance, scroll down to Help > Serial Console, and wait for the console UI to show up.

- In the Appliance console UI choose:
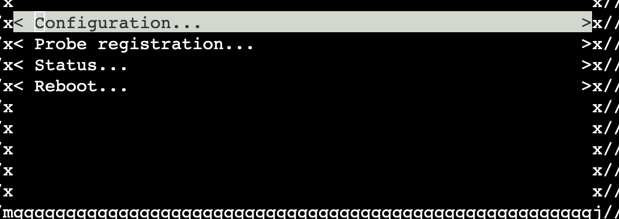
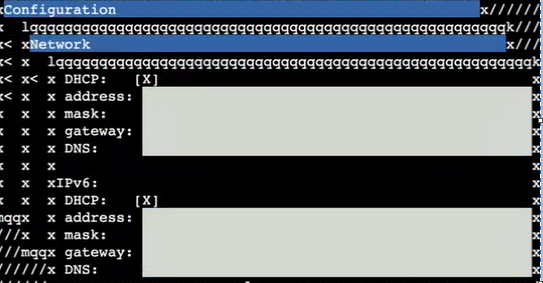
- Configuration > Network and press enter. Now you need to fill out the following values manually and save by pressing F11 (Fn+F11).
- IPv4 address
- IPv4 network
- IPv4 gateway
- IPv4 dns-nameservers
- IPv6 address
- IPv6 network
- IPv6 gateway
- IPv6 dns-nameservers
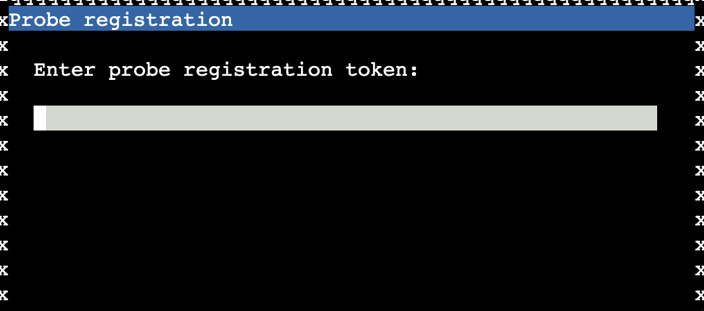
- Then choose the option Probe registration, input the token (located under the Scanner Appliance section in Security Center) and press F11 (Fn+F11) to confirm the registration.
- Configuration > Network and press enter. Now you need to fill out the following values manually and save by pressing F11 (Fn+F11).
- Reboot the appliance.
- In Security Center, you can check the activation to make sure the scanner was registered correctly.
- Done!