If you want to install a new Scanner Appliance for local scanning, simply follow these step-by-step instructions.
Preparing the images
Before you begin the installation process, we highly recommend that you take a look at the requirements. This step will ensure a smooth and successful installation of the Scanner Appliance.
System requirements
The system requirements need to be set prior to booting the scanner appliance for the first time. Read more about system requirements here:
https://support.holmsecurity.com/knowledge/what-are-the-system-requirements-for-the-scanner-appliance
- Login to Security Center.
- Click Scanner appliance > Add appliance.
- Click On-Premise.
- Click Get Started.
- Add the name of the Scanner Appliance, and download the image for the chosen virtualization environment.
- Click Next twice.
- You should see the screen with the scanner name and appliance token. Please write down the appliance token.
- Install the virtualization image on your virtualization platform and start it.
Important: The system requirements must be set before booting the Scanner Appliance for the first time.
Important: The system requirements must be set before booting the Scanner Appliance for the first time.
Configuring the VM
- When the appliance boots, you will see on its screen a Holm Security Probe Configurator menu with four options:
- Configuration
- Probe Registration
- Status
- Reboot
- Choose Configuration > Endpoints > On-prem in the main menu and press Enter.
The listed endpoints are the following:
a. API
b. NVT (download feed)
c. APT (note the use of HTTP and not HTTPS)
d. SSH (optional: only required for NAT mode. See below for more information)
The endpoints can be found in the Web administration user interface of the on-prem system under the General section. (port 8001)
Make sure the protocol and port are correct before saving.
Use Tab and Press OK/Save or F11 (Fn+F11) - It will ask you to trust the certificate if the endpoint server uses a self-signed certificate. Confirm that you want to trust it.
- NOTE: This option is displayed only if the endpoints are reachable.
- Confirm and proceed with rebooting the Scanner Appliance.
- Choose Configuration > Network and press Enter. Now, you need to fill out the following values manually:
- IPv4 address
- IPv4 network
- IPv4 gateway
- IPv4 DNS-nameservers
- IPv6 address
- IPv6 network
- IPv6 gateway
- IPv6 DNS-nameservers
- You are only required to configure one protocol. Press F11 (Fn+F11) when you are done, and you will be returned to the main menu, and the interface will be reconfigured.
Note that if you are using a MacBook, you can save the settings by clicking Actions in the top right menu of the UI console, then Guest OS > Send keys > F11.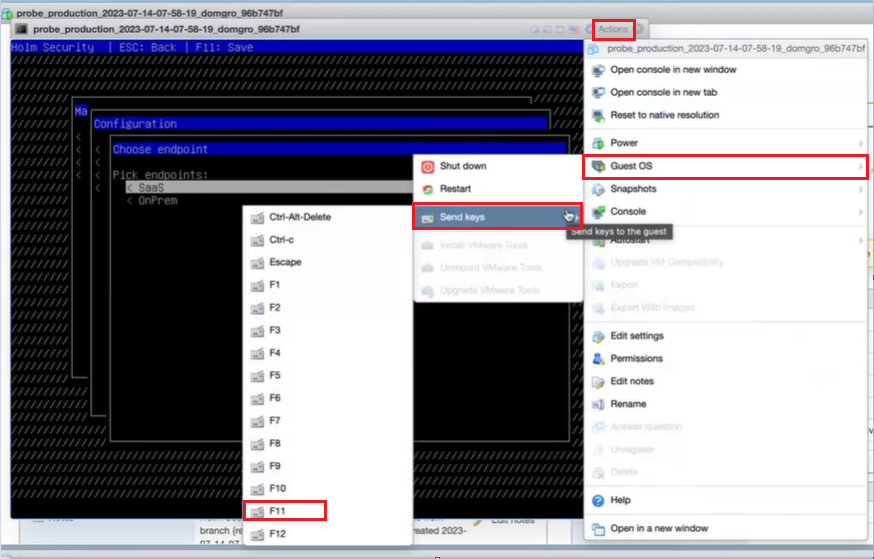
- Make sure you have the correct firewall settings. The appliance must be able to communicate with the core machine on its endpoints.
- Choose option Probe registration, input the token you wrote down in step 7, and press F11 (Fn+F11).
- You are now ready to start the registration procedure. Click Register. The Scanner Appliance sends registration requests and retrieves configuration responses from the platform. You should see a confirmation that the probe has been successfully registered and configured. Click OK to get back to the main menu.
- You can check the activation in the Security Center to ensure the scanner was registered correctly.
- Done!
Validate the connection
Through the endpoints by running a connectivity test. To do so, follow this article: https://support.holmsecurity.com/knowledge/how-do-i-run-a-connectivity-test-for-the-scanner-appliance.
Please note that it may take up to 20 minutes for the Security Center to indicate that a connection is established.
Collector Proxy
Please note that the collector Proxy feature is unavailable for the latest generations (Revision 49+). This feature will be enabled in an upcoming update of the new Scanner Appliance. If this is required, you can keep using the previous generation (Revision 48).